
Ingredients
For the Dough
- 500g bread flour (about 4 cups)
- 350g water (1½ cups warm water)
- 100g active sourdough starter
- 10g salt (2 teaspoons)
For the Filling
- 1 to 1½ cups fresh blueberries
- 2 tablespoons sugar (optional, for sweetness)
- 1 teaspoon lemon zest (optional)
Extra
- Rice flour or regular flour for dusting
- Parchment paper
Equipment
- Large mixing bowl
- Banneton basket or bowl with towel
- Dutch oven or baking stone
- Dough scraper
- Sharp knife or bread lame
Step 1 — Feed Your Starter
Your sourdough starter should be:
- bubbly
- active
- doubled in size
Usually this takes:
- 4–6 hours after feeding
A strong starter gives the bread a beautiful rise.
Step 2 — Mix the Dough
In a large bowl:
- Add water
- Add sourdough starter
- Mix until cloudy
- Add bread flour
- Mix until no dry flour remains
Cover and let rest for:
- 30 minutes
This is called autolyse and helps gluten develop.
Step 3 — Add Salt
Sprinkle salt over the dough.
Wet your hands and fold the dough until fully combined.
The dough will feel sticky — that is normal.
Step 4 — Stretch and Fold
Over the next 2 hours:
- perform 4 sets of stretch-and-folds
- every 30 minutes
How:
- Grab one side of dough
- Stretch upward
- Fold over itself
- Rotate bowl
- Repeat 4 times
The dough becomes smoother and stronger each round.
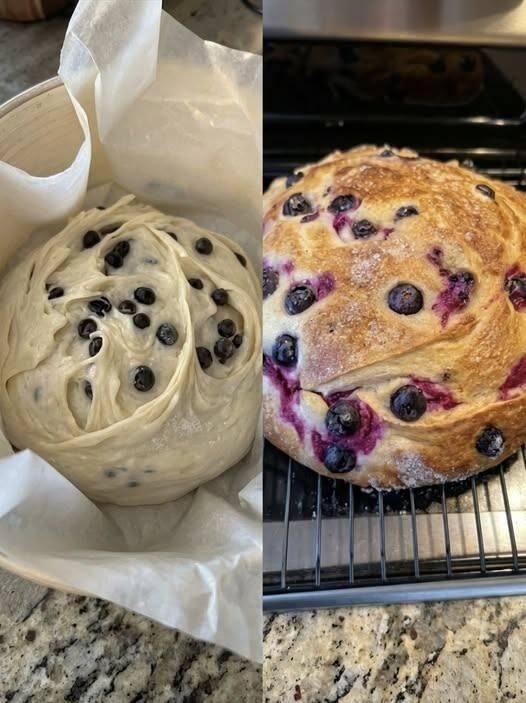
Step 5 — Add Blueberries
After the second fold:
- Gently flatten dough
- Scatter blueberries across surface
- Add sugar and lemon zest if using
- Fold dough carefully
Be gentle so berries do not burst too much.
Some juice is okay and creates beautiful purple streaks.
Step 6 — Bulk Fermentation
Cover dough and let rise:
- 4–6 hours at room temperature
The dough should:
- look puffy
- jiggle slightly
- increase about 50–75% in size
Step 7 — Shape the Dough
Lightly flour your counter.
Turn dough out carefully.
Shape into a tight round loaf:
- fold edges inward
- rotate while pulling toward yourself
This creates surface tension for a good oven spring.
Step 8 — Final Proof
Place dough seam-side up into floured banneton or towel-lined bowl.
Cover and refrigerate:
- overnight (8–12 hours)
Cold proofing improves flavor and makes scoring easier.
Step 9 — Preheat Oven
Preheat oven to:
- 475°F (245°C)
Place Dutch oven inside while heating.
Heat for at least:
- 45 minutes
A hot Dutch oven creates steam and a crispy crust.
Step 10 — Score and Bake
- Place dough onto parchment paper
- Score top with sharp blade
- Transfer into hot Dutch oven
Bake:
- 20 minutes covered
- then uncover
Reduce heat to:
- 450°F (230°C)
Bake another:
- 20–25 minutes
The crust should become:
- deep golden brown
- crisp
- slightly blistered
Step 11 — Cool Completely
This is VERY important.
Let bread cool:
- at least 1–2 hours
Cutting too early can make the inside gummy.
Flavor Notes
This bread tastes:
- mildly tangy
- slightly sweet
- juicy from blueberries
- crispy outside
- soft and chewy inside
Perfect with:
- butter
- cream cheese
- honey
- toasted walnuts
Tips for Success
Use Dry Blueberries
Too much moisture can weaken the dough.
Pat berries dry before adding.
Don’t Overmix
Blueberries burst easily.
Gentle folding keeps beautiful pockets of fruit.
Cold Dough Scores Better
Cold proofed dough holds shape and expands beautifully in the oven.
Storage
- Room temperature: 2 days
- Refrigerator: 5 days
- Freeze slices up to 2 months
Toast before serving for best flavor.
Optional Variations
You can also add:
cream cheese filling
white chocolate chips
cinnamon
walnuts
orange zest